User Guide
Download and installation
-
Several files are available for download :
- the setup package that includes the English language module.
- If you need another language, first install the setup package, then the language module of your choice : Spanish, French or Italian.
- If a release of Co-driver has been installed previously, it must be uninstalled first.
- After downloading and unziping the installation package, start the installer by double-clicking the setup.exe file and follow the instruction of the installer.
- If your Assetto Corsa is not in the standard disk location, change the installation folder in the installer dialog : the installation path must be set to your assettoCorsa folder.
- Don't try to do the installation by copying manually the files from the setup package : this will result in a faulty installation and Co-driver won't work.
- Don't forget to enable the Co-driver app in AC, in the general options.
- Remark : It is not necessary to uninstall the Copilot. If you have pace-notes established for Copilot, you may wish too keep the Copilot available.
Where are Co-driver files ?
- In Assetto Corsa apps\python\Codrivers : here are the installation, py scripts and binary files. users MUST NOT change them.
- In your Documents\Assetto Corsa\plugins\Codriver : this folder contains the data that belong to the user ; everything that you may change is located there : pace-notes files, settings, grammar definition and Voices foders. Some of these files are created during the first use of the program.
- In the app\python\Codriver\Install folder, you can find the initial version of settings, rules and glossaries. So you can restore the initial version of these files. by copying them into the Documents area.
Testing the installation

-
The package installer includes a demo pace-notes file for Trento-Bondone.
- Start a practice session on the Trento-Bondone track.
- Launch the Co-driver app : the user interface (UI) must be displayed.
 Click the start button : the count down will start ... See you at the finish line.
 At any moment, press the Help button in order to display the User Guide.
The user interface
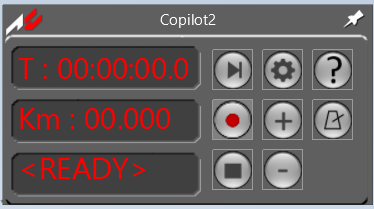
- : Starts the countdown and the reading of pace-notes that were previously recorded.
 : Starts the recording of a pace-notes file.
 -
 : Halts the run mode or finish the recording of a recce. A second click on this button
will reset the chronometer.
: Halts the run mode or finish the recording of a recce. A second click on this button
will reset the chronometer.
- : Displays the present User Guide at Co-driver web site.
So, you can also use this button to see the Best Times Board page.
-
 and
and  : Browse circularly thru the parameters list displayed in the bottom display of the UI:
- Count : Duration of the count down, in seconds.
- Laps : Number of laps. See Looped tracks
- Vol : Audio volume for Co-driver. If the Co-driver volume is insufficient when the parameter is set to the max value (10), you must ajust the volume of Co-driver in the Windows mixer or reduce AC general volume in the audio options.
- Track : + / - toggle between Tarmac and Dirt. See Brake points
- Brake : Coefficient for the brake call. See Brake points
- CAS1 : Calls Anticipation Span #1 : Notes for a corner are basically called at the beginning of the previous corner. Users may anticipate the call using the CAS1 parameter : a value of 1.0 means the call is done one second before the entry into the corner. The default value is 0.30 sec.
- CAS2 : Calls Anticipation Span #2 : similar to CAS1 but the anticipation span is proportional to the speed of the car. CAS2 = 1.00 (default) means the call is done 1 second sooner for a speed of 100 Km/h and 0.50 second for a speed of 50km/h and so on. The anticipation resulting of CAS1 and CAS2 are added together to give the total amount of anticipation.
- Size : relative size of the User Interface : default value 0.75 (set for a 1920 x 1080 screen resolution). Remark : the session must be exited and restarted for a change of size to apply.
- Mode : Notes reading mode. See Notes modes
- Lang : Selection of the language used for reading the pace-notes. Only English is available if you haven't' install another language module.
- Optm : used during recce recording. Allows or inhibates the optimizer at the end of the recce. See Optimization of pace-notes data.
- Sensibility : used during the recce recording, defines the level sensibility for discarding insignifiant corners. See Recording a "recce"
- Best : Your personnal best time for this combo.
- Clock : Select the position where the count-down clock and the error message are displayed in relation with the UI(Right, Left, Top or Bottom).
- RptButton : repeat button number [0 to 15]. 0 = no button assigned.
- Quiet : suppress the vocal corners call during recce recordings.
-
 and
and
 : Once a paramater is selected with the DSP button, the + and - buttons allows to change the value
for this parameter.
: Once a paramater is selected with the DSP button, the + and - buttons allows to change the value
for this parameter.
 : Starts the pace-notes editor. See Editing the pace-notes file
Recording a "recce"
In order to record a recce, start an AC practice session and drive the car to the start line, then stop the car. Push the button. From this point,
the Co-driver will record any turn of the stage, with its position, direction and curvature. The quality of this recording
depends on the regularity of your driving :
- Avoid any hasty movement of the wheel and pedals. Avoid drifting, cutting ...
- Basically, there are two strategies possible to record a reconnaissance : If a fast_lane.ai file exists for this track,
- Activate the optimizer before starting the recording, setting the Optm : True.
- Drive in the middle of the track. If there is a white line, just follow it.
- If the fast_lane doesn't exist or if you prefer optimize yourself the notes :
- Set the parameter Optm : False
- Drive the reconnaissance following an ideal trajectory.
During the recce, you can hear vocal information that tells you what is being recorded in the recce file. Note that this vocal information is not
definitive : the optimization phase, done at the end of the recording, may change the data in order to give better notes.
If you find this vocal information disturbing, use the Quiet option of the UI to make Co-driver silent during recce.
Once you reach the finish line, stop the car on this line and press the button. Wait for the optimization process to end
before quitting the AC session.
Short fast corners are not recorded by the recce. This avoid to record small adjustments of the trajectory or insignificant kinks. You can adjust the level of sensibility of the recording using the parameter Sensibility in the User Interface. The minimum value is 0 : short fast corners are systematically discarded. The maximum value is 10 : most moves of the steering wheel are registred as corners. The default value is 7.
Optimization of pace-notes data
The idea of optimization is due to Gigi Monticelli : the pace-notes recorded during the recce phase are based on the "middle of the track trajectory". Actually, this is not the trajectory that a real driver will use : he will find an optimal trajectory, taking advantage of the width of the track. This "ideal trajectory" may be already recorded in the fast_lane.ai file. This file is usually used by AC in order to display the fast line or to drive the ai cars. So the optimization idea is to use the fast lane for the optimization of the pace-notes.
The optimization process in Co-driver starts automatically when you stop the recording of a recce. You will hear a message "Optimization in progress" The process may take some time (Up to 30 sec or more for a long track). Wait until you hear "Recce ended" before exiting the AC session.
If a fastline.ai file cannot be found for the track, the Co-driver program will compute a "best trajectory" of his own. But it is not as accurate as the use of a fastline file.
The pace-notes system : data recorded
distance
Distance is the distance of flat road, in meters, between the ending of the previous turn and the beginning of the announced turn. When a turn goes immediately into another one, the distance reading is omited, it is replaced by :
- "Into" if the distance is less than 5 meters.
- "For" if the distance is less than 15 meters.
- "And" if the distance is less than 30 meters.
direction
"left" or "right"
severity
Turns are classified depending on their steering radius, according to a scale that includes 8 levels :
| Numeric | Descriptive | Angular |
|---|---|---|
| 0 | Tight hairpin | Tight hairpin |
| 1 | Hairpin | Hairpin |
| 2 | Bad | 80 |
| 3 | Kay | 100 |
| 4 | Middle | 120 |
| 5 | Fast | 140 |
| 6 | Very fast | 160 |
| 7 | Flat | Flat |
This severity level is refined using the qualifiers "minus" and "plus" : a "bad minus" corner is easier than an "hairpin plus" and more difficult than a "bad" corner.
This applies to severity level 1 to 6.
In the "angular" mode, minus and plus adjustments are expressed as intermediary angles : 5- or 4+ are called as 130.
Remark : The severity depends only on the curvature of the corner (curvature is the math inverse of the steering radius). It doesn't take in account other factors such as the state of the road, the car, the bumps or other hazards.
Corner length
The length of the corners is classified as :
- short
- normal or none
- long
- very long
- extra long
This classification is done according to parameters located in the setting.xml file. Remark that this classification is related to the severity of the corner.
Corner profile
- Opens : The curvature is reduced in the the second half of the corner.
-
Tightens : The curvature increases in the second half of the corner. If the corner tighens more than one degree on the severity scale,
the highest level of severity reached is added to the profile. For instance "Middle tightens bad"
- Opens and tighens : The curvature decreases then increase again, near the end of the corner.
- Chicane : See Chicanes
The notes modes
The driver can select a note mode, according to his personal preference. This mode will change the way the notes are read by the Co-driver during the run.
-
DESC : Descriptive mode.
- The severity is expressed by the term used in the description given above (hairpin, bad ...).
- Example : the note "100 L4+" will be read as "one hundred, middle plus left"
-
NUM : Numeric mode.
- The severity is expressed aa the number
- Example : The note "100 L4+" will be read as "one hundred, left for"
-
ANG : Angular mode.
- The severity is expressed as a number measuring the turn angle where 90 means right-angled and 180 means flat angle.
- Example : The note "100 L4+" will be read as "one hundred meters, left one hundred and thirty."
- This mode is inspired by the system used by Loeb/Elena and other french teams. It sounds a little verbose in English, but is much more compact in french. In this idiom, the example becomes "cents mètres, gauche cent trente"
- CST : Custom mode. It allows advanced users to develop their personal note system.
Editing the pace-notes file
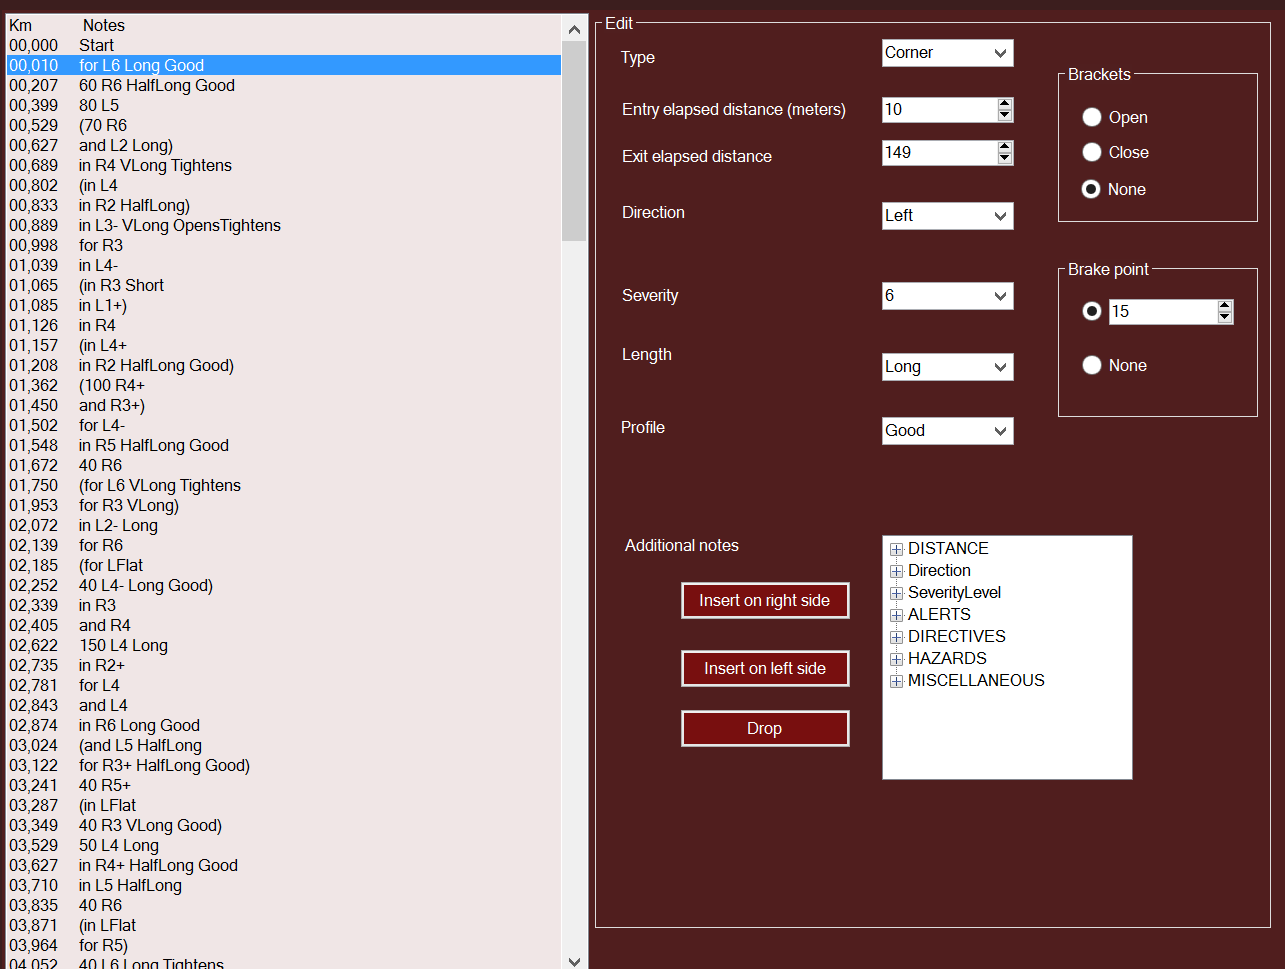
When the Co-driver is in wait or run mode, pushing the Edit button will display the Pacenote Editor.
- Select a corner in the list on the left side.
- Change the corner characteristic in the central window.
- Press the OK button on the right side to validate the change.
Parenthesis
- Parenthesis are used to group several corners togever. Grouped notes will be read in one raw, without pause between each corner.
- Some corners are grouped automatically during the recce process.
- Users can add or suppress parenthesis in the editor.
Comments
- Comments are grouped in 3 categories : Directives, hazards, miscellaneous
- Select a category, then a comment in the list box, then press "insert on right side" or "insert on left side".
- To suppress a comment, select the comment that you want to delete then press "drop".
- Press the validation button.
Going back to AC
- Press OK button to confirm the changes if needed.
- Or press the Cancel button.
- If you were in the run mode when the editor was called, the run will resume at the same point, but the chronometer is reset to zero and your best time can not be recorded.
Chicanes
- A chicane is a fast succession of tight corners in opposite directions.
- The recce of Co-driver will identify them as two (or three) distinct corners.
-
In such a situation, if you want Co-driver to call "Chicane" instead of two corners,
- In the note editor, find the first corner and change its profile to "Chicane".
- Suppress the second corner. (eventually also the third if double chicane)
- Such a note will be called as "Chicane left" or "Chicane right".
Replay
- Co-driver can be used while AC is replaying.
- This works only during a session : it you halt the session and set AC in replay mode, Co-driver will automatically synchronize with the replay.
- It don't works with a recorded replay.
- This feature is very useful to review the notes after a run : you can see the replay while hearing the notes and use the pace-notes editor if needed.
Brake points
- When a fast flat section is followed by a tightened corner, Co-driver announces the point where braking must begin with a "brake" directive.
- This point is computed dynamically according to the speed of the car.
- Before the run start, choose the type of track in the UI : Tarmac or Dirt. This corresponds to two distinct sets of parameters (in Settings.xml) for the determination of the braking points.
- You may ajust the braking distance computation in the parameter "brake" accessible in the User Interface.
- The brake parameter is set by default to 1.0.
- If the grip for this track is good, you may reduce the brake parameter around 0.7.
- With a dirt or iced track, you may increase this value up to 1.4.
- You can also adjust (or suppress) the braking point for a specific corner in the pace-notes Editor.
- The brake directive is announced only when the speed of the car is over 100 km/h (Tarmac) or 80Km/h (Dirt). You may ajust these limits in the settings.xml file.
Advanced tuning
- In the setting.xml file can be found more parameters related to the brake point call.
- BrakingCallSpeedLimit : brake point will not be called if the car speed is less than this limit.
- MaxSpeedCorner1 to MaxSpeedCorner6 : maximum speed for corners of severity 1 (hairpin) to 6 ()
- brackinganticipation : reaction time, in seconds, for the driver and the system. Default : 0.5
- Remarks : two sets of independent parameters exist, one for Tarmac track, the other for Dirt.
Repeat button
- You can affect one of the button of your wheel to ask Co-driver to repeat the pending notes.
- By default, the repeat button is not assigned ( RptButton : 0).
- You can assign it to any button between 1 and 15 using the UI parameter "RptButton".
Looped tracks
-
Co-driver can be used with looped tracks.
- Record the recce, one lap only, taking care that the start and finish points be approximatly at the same place : an error up to 10 meters is supported.
- Before starting a run, set the number of laps in the parameter laps of the UI.
Best times
- Co-driver manages a database of your personal best time for each combo (track + car model). It is updated automatically each time you cross the finish line.
- Best times are not recorded if you start before the green light (false start) or from a place distinct of the starting line.
- Use the or button to browse to the display of your best time (Best :).
- Each time you improve your best time, Co-driver asks if you want to upload this into the Best Time Board of the web site.
- Visit the "Best times" page of this site.
Editing the grammar
- Before doing any change, make sure that Microsoft Speech Synthesizer Lingistic module is available on your computer.
- You may wish to edit the grammar files in order to add new comments, modify the way a note is called or add a new language.
- The grammar is constitute of two type of files : glossaries and rules.
- There is a glossary file for each language installed. A glossary defines the way a term in called in that language.
- Rules defines the way terms are put together in order to form a phrase.
- Co-driver provides a grammar editor. Use the shortcut present in the Documents area to start the editor. Don't try to edit directly the xml files. It may result in problems difficult to diagnose.
- IMPORTANT : after a modification of a glossary or of the rules, the audio messages must imperatively be generated again.
Glossary
- The term used by Co-driver are gathered by groups. In the Grammar editor / Edit glossaries tag, you will see the list of existing groups. Select a language, expand the group you want to change and select a term. You can modify the text associated with a term
- Remarks : some groups are declined in 3 groups that correspond to the various modes available : ANG (angular), NUM (numeric) and DESC ( descriptive).
- For the Comments groups only, the user may insert (and delete) new terms.
- Don't forget to generate the audio messages once the editing of the glossary is finish.
Rules
- Rules are constitute of two part : the filter and the body of the rule.
- The filter corresponds to the conditions in witch the rule applies.
- Rules are tested from top to bottom. The first rule with valid conditions is applied.
- The body of the rule defines how the elements are assembled to create the text of a note.
- The body is a list of variables separated by a comma. A variable name starts with a $ character.
- For instance, the body of a rule that applies to numeric notes may be $distance, $commentsBefore, $direction , $severity, $cornerProfile, $cornerLength, $commentsAfter. It means that such a note will begin with the distance, then the comment before (if it exists), the direction (left or right) and so on. For instance "one hundred, caution, right, hairpin".
- the comma results in a short pause when the note is called. In some cases, it may result in an unnatural speech. Replacing the comma between two variables by a '+' create a message linking the two variables without any pause. The previous example may be changed in this way : $distance, $commentsBefore, $direction + $severity, $cornerProfile, $cornerLength, $commentsAfter. Now, there is no pause between direction and severity. Beware : using + creates as many audio files that the combinaison of the two terms.
- You can also use a constant text rather than a variable.
- the word pause is interpreted as a short silence (0.5 seconds).
How to create a new language module ?
- In the Documents\... \Grammar folder, duplicate the file glossary.ENG.xml into glossary.CUS.xml (CUS meaning custom).
- Modify the new file glossary.CUS.xml with the notepad : Replace in line #4 : Language="ENG" by Language="CUS"
- Start the grammar Editor and update you new glossary, replacing all English text by the one in your language.
- Generate the audio messages and start a run. Change the language in the UI to CUS.
- How does it sound ? If Ok, congratulations ! If no, you probably will have to modify some rules in order to improve your new linguistic set. Ask for support if you don't know how to do it.
- If you are pleased with the result, don't hesitate to share your work.
Parameters
- Many parameters of Co-driver can be modified directly in the user Interface. These parameters are documented in
The user interface. The others can be found in the file settings.xml
(in Documents/Asssetto Corsa/plugins/Co-driver). This file can be modified using the notepad or any other text editor.
Superstitious users will do a backup of their settings.xml before trying any change. If you break everything and want to
restore the intiallation version, just delete the settings.xml. A new one will be created automatically.
- MaxDistInto to MaxDist500 : Don't change these. Give the distance in meter associated with a distance called.
- SteeringSeverityDiscarded to SteeringSeverity1 : Give the level of severity of a corner as a function of the maximum curvature reached during the corner. It's better not to change this.
- Long1 to Long6 : define the minimum lenght of "long" corner, as a function of the severity level.
- CoefDiscard to CoefXtraLong : coeficient applied to the long parameter value in order to determine short, very long, extra long or discarded corners.
- Language : code language for the reading of the notes.
- ServerIpa : url of Co-driver web site. Don't change this.
- ServerIpaDebug : debugging purpose : local url.
- SynchStep : Don't change this !
- CallAnticipationSpan1 and CallAnticipationSpan2 : see CAS1 and CAS2 in user interface.
- NotificationDelayFactorLong to NotificationDelayFactorXlong : during a long corner, the reading of notes is delayed according to the length of the corner. The value is between 0.0 and 1.0 : 0 : the call is not delayed and the call is done at the entry in the corner; 1 : the call is delayed until the end of the corner.
- SplitNotification1 to SplitNotification6 : Split Notification distance, according to severity. example : for a corner of severity 3, the notification will be split if the distance to the next corner is more than 50 meters.
- MaxSpeedCorner1Dirt to MaxSpeedCorner6Dirt : used for brake point calculation. Maximum speed allowed at the entry of a corner of severity level 1 to 6, for a dirt track
- BrakingInertiaFactorDirt : see parm "brake"Brake points
- BrackingAnticipationDirt : anticipan span time in second. Example if value = 1, the brake point is called 1" before the brake point calculated.
- BrakingCallSpeedLimitDirt : the brake point is called only if the speed is higher than this limit.
- MaxSpeedCorner1Tarmac to BrakingCallSpeedLimitTarmac : same thing for a tarmac track.
- OptimizationRange : maximum difference (meters) of starting point between the recce and the fastlane.
- ParenthesisSeverityFactor : defines the gap of severity between to corners that will enclose these corners between parenthesis.
- CautionSeverityFactor : defines the gap of severity between to corners that will spawn a "caution" note.
- BracketingDistance : maximum distance between two corners that could be grouped between parenthesis.
- SampleDistance : don't change this !!!